Foreword
接上篇,onion编译固件,可能还需要更新u-boot,做一些修改
u-boot
https://github.com/OnionIoT/u-boot
https://github.com/OnionIoT/omega2-bootloader
搭建环境
一键自动安装环境,还是比较简单的
sh setup_env.sh
增加build的权限
chmod +x ./build.sh
编译
build
./build.sh
顺利的话就能看到编译成功了
		-Map u-boot.map -o u-boot
/opt/buildroot-gcc342/bin/mipsel-linux-objcopy --gap-fill=0xff -O srec u-boot u-boot.srec
/opt/buildroot-gcc342/bin/mipsel-linux-objcopy --gap-fill=0xff -O binary u-boot uboot.bin
./tools/mkimage -A mips -T standalone -C none \
	-a 0xBC000000 -e 0xbc000000 \
	-n "SPI Flash Image" \
	-r DDR2 -s 16 -t 128 -u 32 \
	-y 0xFF -z 0xFF -w 0xFF -d uboot.bin uboot.img
Image Name:   SPI Flas
Created:      Fri Mar 31 19:52:15 2023
Image Type:   MIPS Linux Standalone Program (uncompressed)
Data Size:    173124 Bytes = 169.07 kB = 0.17 MB
Load Address: 0xBC000000
Entry Point:  0xBC000000
DRAM Parameter: 2b (Parm0=0 Parm1=0)

===============<<IMPORTANT>>==================
Notes:Uboot firmware is uboot.bin NOT uboot.img
================================================

> Done
编译后的bin文件就直接在目录下
uboot-omega2p-20230401.bin
uboot-omega2-20230401.bin
boot文件过大
有可能会遇到当前uboot最大存储范围是128k,但是当前uboot太大了,这个时候可以通过关闭一些配置来节省空间
修改config.mk 可以将EHCI和OHCI全部关闭
 RALINK_EHCI = OFF
 RALINK_OHCI = OFF
刷写方式看情况保留,如果都是通过WEB刷写,那么把web的保留就行了,其他的不用可以去掉
ONION_WEB_FLASH = ON
ONION_TFTP_FLASH_SDRAM = OFF
ONION_TFTP_FLASH = OFF
ONION_USB_FLASH = ON
别都去了,否则就无法刷固件了
关闭OHCI效果还是比较明显的,可以一下节省50多KB字节
-
RALINK_OHCI,一个不仅仅是usb用的主控制器接口标准。主要是遵循csr (configuration space register)标准。是其他厂商在设计usb host controller时遵循的标准,如via, nec, ali, 包括nvidia等等。支持USB1.1的标准。
-
RALINK_EHCI,是Intel主导的USB2.0的接口标准。EHCI仅提供USB2.0的高速功能,而依靠UHCI或OHCI来提供对全速(full-speed)或低速(low-speed)设备的支持。
修改启动引脚输出
修改boot阶段的引脚状态,比较简单,直接改lib_mips\board.c即可
void custom_GPIO_init()
{
    xxxx;
    xxxxx;
    xxxxxx;
}

void board_init_r (gd_t *id, ulong dest_addr)
{
	cmd_tbl_t *cmdtp;
	ulong size;
	extern void malloc_bin_reloc (void);
#ifndef CFG_ENV_IS_NOWHERE
	extern char * env_name_spec;
#endif
	char *s, *e;
	bd_t *bd;
	int i;
	int timer1= CONFIG_BOOTDELAY;
	unsigned char BootType='3', confirm=0;
	int my_tmp;
	char addr_str[11];

	......

	/** leave this here (after malloc(), environment and PCI are working) **/
	/* Initialize devices */
	devices_init ();

	jumptable_init ();

	/* Initialize the console (after the relocation and devices init) */
	console_init_r ();
    custom_GPIO_init();

	......

}
主要参考:
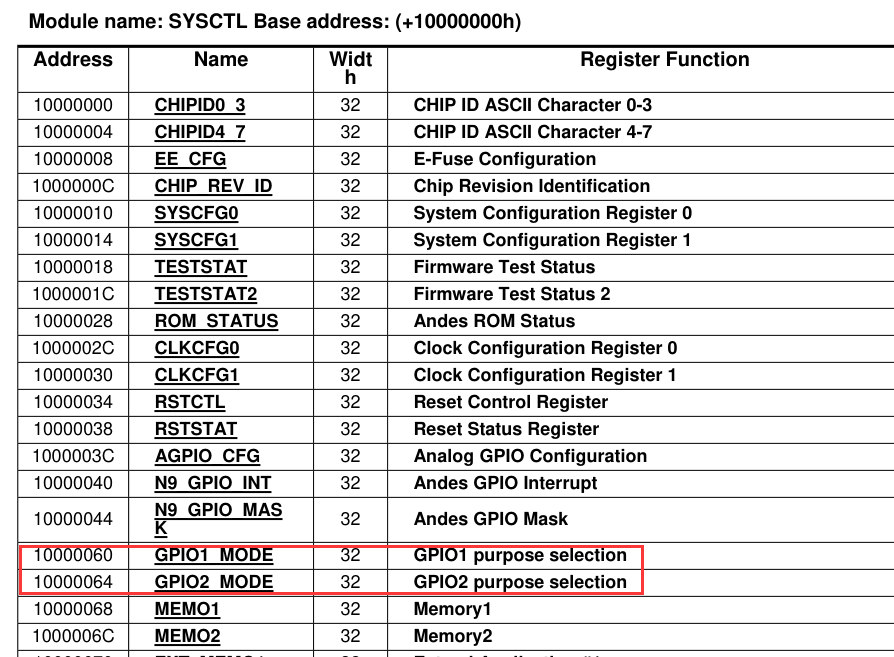
设置GPIO的模式

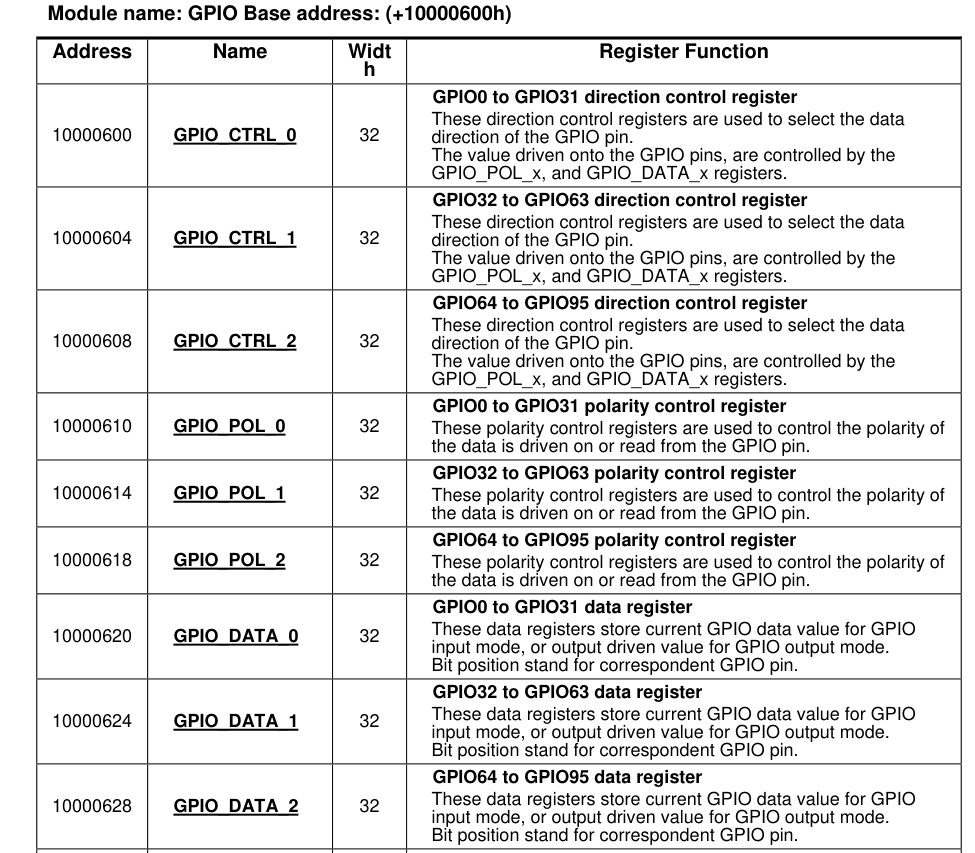
设置GPIO的输出方向和输出值

Summary
easy
Quote
https://github.com/OnionIoT/omega2-bootloader
http://docs.onion.io/omega2-docs/Web-Recovery-flash-bootloader.html