Foreword
从ubuntu 16升级到20,突然发现好多库,老得不能用了,所以只好探索一下新的方法
主要是在ubuntu下使用eclipse编译stm32,方法其实挺老的,都用了好几年了,现在可能还有更好的方法。
环境
- ubuntu 20.04和18都可以直接成功,16,14是另外一套安装方法
- eclipse
切换软件源
老生常谈,默认源太慢了,先备份老的源
sudo cp /etc/apt/sources.list /etc/apt/sources.list.bak
sudo vi /etc/apt/sources.list
然后替换成下面的内容
#添加阿里源
deb http://mirrors.aliyun.com/ubuntu/ focal main restricted universe multiverse
deb-src http://mirrors.aliyun.com/ubuntu/ focal main restricted universe multiverse
deb http://mirrors.aliyun.com/ubuntu/ focal-security main restricted universe multiverse
deb-src http://mirrors.aliyun.com/ubuntu/ focal-security main restricted universe multiverse
deb http://mirrors.aliyun.com/ubuntu/ focal-updates main restricted universe multiverse
deb-src http://mirrors.aliyun.com/ubuntu/ focal-updates main restricted universe multiverse
deb http://mirrors.aliyun.com/ubuntu/ focal-proposed main restricted universe multiverse
deb-src http://mirrors.aliyun.com/ubuntu/ focal-proposed main restricted universe multiverse
deb http://mirrors.aliyun.com/ubuntu/ focal-backports main restricted universe multiverse
deb-src http://mirrors.aliyun.com/ubuntu/ focal-backports main restricted universe multiverse
#添加清华源
deb https://mirrors.tuna.tsinghua.edu.cn/ubuntu/ focal main restricted universe multiverse
# deb-src https://mirrors.tuna.tsinghua.edu.cn/ubuntu/ focal main restricted universe multiverse
deb https://mirrors.tuna.tsinghua.edu.cn/ubuntu/ focal-updates main restricted universe multiverse
# deb-src https://mirrors.tuna.tsinghua.edu.cn/ubuntu/ focal-updates main restricted universe multiverse
deb https://mirrors.tuna.tsinghua.edu.cn/ubuntu/ focal-backports main restricted universe multiverse
# deb-src https://mirrors.tuna.tsinghua.edu.cn/ubuntu/ focal-backports main restricted universe multiverse
deb https://mirrors.tuna.tsinghua.edu.cn/ubuntu/ focal-security main restricted universe multiverse
# deb-src https://mirrors.tuna.tsinghua.edu.cn/ubuntu/ focal-security main restricted universe multiverse multiverse
安装gcc_arm_none_eabi
ubuntu<=16.04
通过下面的步骤就能正常,安装了
Step1: Inside Ubuntu, open a terminal and input
       "sudo add-apt-repository ppa:team-gcc-arm-embedded/ppa"

Step2: Continue to input
       "sudo apt-get update"

Step3: Continue to input to install toolchain
       "sudo apt-get install gcc-arm-embedded"

To remove installed toolchain, just input "sudo apt-get remove gnu-arm-embedded".
To update the toolchain, just repeat above step2 and step3.

If it reports error message of conflict to gcc-arm-none-eabi, which is likely if upgrading from 4.x to 5+, please uninstall it first with:
       "sudo apt-get remove gcc-arm-none-eabi"

Questions should be asked at https://answers.launchpad.net/gcc-arm-embedded
ubuntu>=18.04
sudo apt-get install gcc-arm-none-eabi
但是这样装完的,没有gdb的调试,而直接安装gdb也会提示仓库中不存在
所以就需要手动下载安装下面两个安装包
https://packages.ubuntu.com/xenial/libreadline6
https://packages.ubuntu.com/xenial/gdb-arm-none-eabi
sudo dpkg -i libreadline6_6.3-8ubuntu2_amd64.deb
sudo dpkg -i gdb-arm-none-eabi_7.10-1ubuntu3+9_amd64.deb
然后就可以通过eclipse进行调试了
不建议这样使用,还是退回到16.04以后吧,这样虽然安装成功了,也能用了。但是配合eclipse经常出现调试问题,什么无法断点,什么单步执行不正确,跳转错误之类的问题。但有的时候又是完全正常的,调试个几次才能正常使用一次,非常蛋疼,原因还找不到,建议退回
eclipse
安装eclipse需要先安装java,然后才能安装eclipse
sudo apt update
sudo apt install default-jre
sudo snap install --classic eclipse
eclipse插件
install gnu arm plugin
1) open eclipse, click help, click install new software
2) click add, and then click archive. choose ilg.gnuarmeclipse.repository-3.3.1-201702251311.zip
3) follow the guide complete the install, internet may be required during installation
安装jlink
double click JLink_Linux_V614b_x86_64.deb and follow the guide
配置eclipse
配置debug之前,最好先成功编译一次,否则下面要求的demo.elf文件不存在了
before set debug configuration,you should build first to create corresponding debug file config debug
-
click the triangle at the right of debug icon,open Debug Configurations….
-
add new in GDB SEGGER J-Link Debugging
-
switch to Main,set Project:demo
-
C/C++ Application: click browse… select demo_uav.elf in debug file
-
set Build Configuration:Use Active
-
switch to Debugger,set Device name,lik:STM32F767VI
if you want to connect a running target, you need check the option ‘‘Connect to running target’‘,or it will restart the cpu then enter the debug mode
-
switch to Common,check the Display in favorites menu ‘‘Debug’’ if you need multi configurations,you could build and then choose demo_uav.elf in the corresponding pah like: HIL
配置烧写
-
click the triangle at the right of run flash icon,open External Tools Configurations…
-
switch to Main,add new in Program
-
set Location:/usr/bin/JLinkExe if your JlinkExe not in here,use “sudo find / -name JLinkExe” to find its path
-
set Working Directiory:${workspace_loc:/demo}
-
set Arguments:-CommanderScript ./flash.jlink if you need flash with boot set Arguments:-CommanderScript ./flash_with_boot.jlink
-
switch to Common,check the Display in favorites menu ‘‘External Tools’’ you should make 2 configurations ,one is flash,the other is flash with boot
安装qv2ray
可能一些包是国外的,为了下载最好先弄个翻墙,省得麻烦
由于是老ubuntu 16.04 所以实际上qv2ray的官方教程根本不顶用。
所以简单起见,直接用现成的,而不是通过包管理安装。
https://github.com/Qv2ray/Qv2ray/releases
https://github.com/v2fly/v2ray-core/releases
先下一个Qv2ray.v2.7.0-pre2.linux-x64.AppImage
然后再搞一个v2ray的core就行了v2ray-linux-64.zip
解压以后,修改qv2ray的配置为刚才下的v2raycore即可
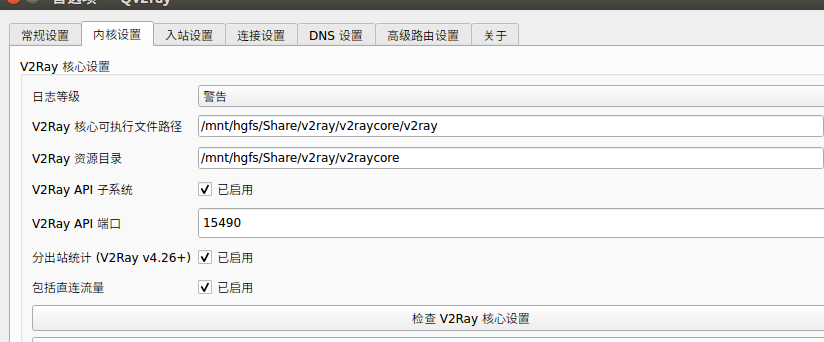
订阅设置需要在分组里设置,系统代理建议开启,否则不一定能被代理到
没想到没过多久,qv2ray就直接停止维护了,还搞了一堆破事。然后qv2ray确实也不够好用,只要用了一次就强行设置了系统代理,而退出却不能取消代理,这就很弱智了,必须要手动操作才行
Summary
…
Quote
https://acassis.wordpress.com/2018/12/27/adding-arm-none-eabi-gdb-to-ubuntu-18-04/
https://zhuanlan.zhihu.com/p/134031693