Foreword
之前做了QEMU模拟运行FreeRTOS,模拟STM32,但是毕竟不是官方QEMU,对于嵌入式这边的芯片或者设备模拟还是差一点。
https://www.qemu.org/docs/master/system/arm/stm32.html
Renode比较知名的就是用来模拟物联网设备,这种设备往往都弱一些,MCU这种比较多。
具体关于这两个说法有很多,谁更合适还是要实际用一用,体验一下才行
Renode
https://renode.io/
https://github.com/renode/renode
Renode 的指令模拟器使用 C 语言编写,外设模拟器使用 C# 语言编写,兼顾了运行效率和开发效率.
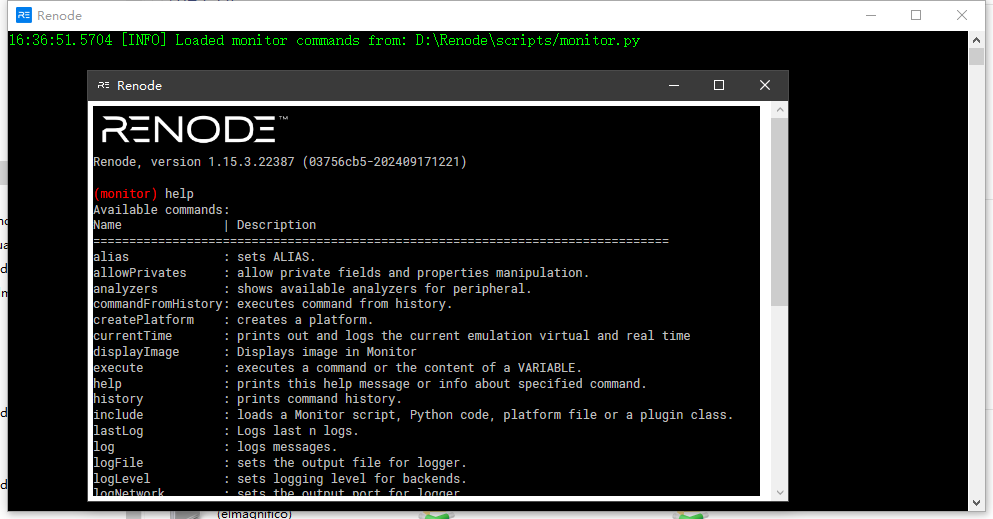
Windows下直接安装即可,启动以后是一个命令行程序,这里可以加载我们的模拟固件
测试
start @scripts/single-node/stm32f746.resc
不建议跑这个例子,只是个输出helloworld,超级卡
start @scripts/single-node/stm32f746_mbed.resc
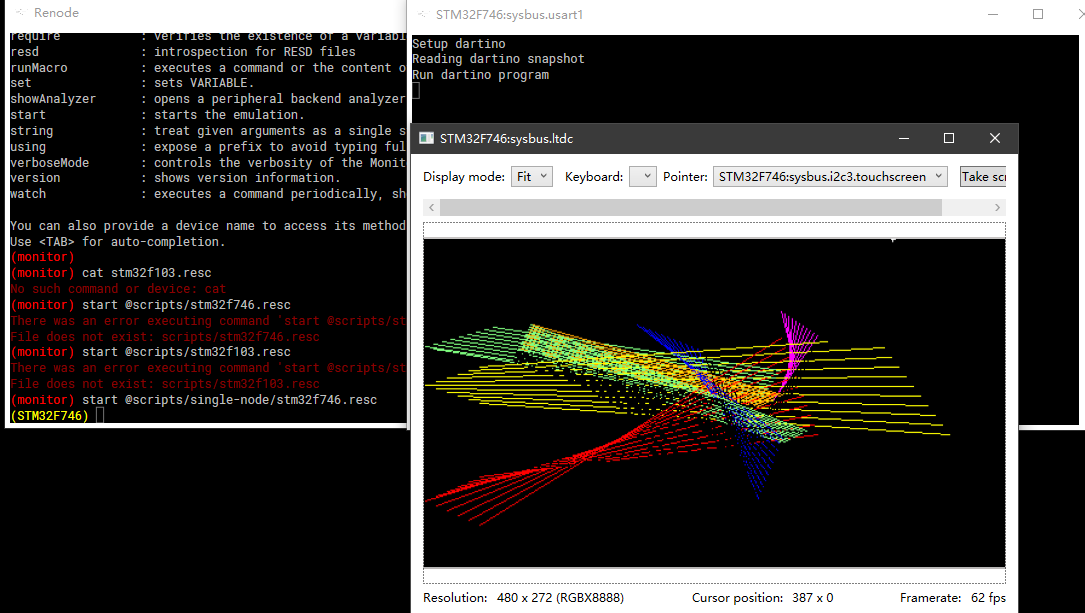
启动以后就能看到输出了
stm32f746.resc文件解析
# 定义仿真平台和描述
:name: STM32F746
:description: This script runs Dartino on STM32F7 Discovery.

# 创建仿真机器
using sysbus
$name?="STM32F746"
mach create $name

# 加载平台描述
machine LoadPlatformDescription @platforms/boards/stm32f7_discovery-bb.repl

# 配置显示和分析器
# 设置LTDC(LCD-TFT显示控制器)在仿真中的虚拟帧率为每秒100帧;
# 详细解释如下:
# ltdc:指的是仿真平台中的LTDC外设(LCD-TFT显示控制器);
# FramesPerVirtualSecond:表示“每虚拟秒的帧数”,即仿真环境下LTDC每秒刷新多少帧;
# 100:具体的帧率数值,这里设置为100帧每秒;
# 作用:
# 在Renode仿真环境中,LTDC的显示刷新速度会按照这个帧率进行模拟。这样可以控制仿真中LCD显示的流畅度和性能,便于调试和观察# 显示效果;
# 总结:
# 这条指令就是让仿真的LTDC每秒刷新100帧,用于控制虚拟LCD的显示速率;
ltdc FramesPerVirtualSecond 100

showAnalyzer usart1
showAnalyzer ltdc

# 指定要加载的固件,需要elf,而不是bin
$bin ?= @https://dl.antmicro.com/projects/renode/dartino-lines.elf-s_486816-cd8876ab9de60af779f4429dfe16c79bf831b84d


# 可以在模拟启动以后开启Gdb,这样就能直接接入进行调试
# machine StartGdbServer 3333 true

# 定义reset宏
macro reset
"""
    sysbus LoadELF $bin
"""

# 自动运行reset宏
runMacro $reset
platforms/boards/stm32f7_discovery-bb.repl,关于硬件的描述在本地就有,看一下具体内容
using "platforms/cpus/stm32f746.repl"

phy: Network.EthernetPhysicalLayer @ ethernet 0
    Id1: 0x0007
    Id2: 0xC0F1
    AutoNegotiationAdvertisement: 0x00A1
    AutoNegotiationLinkPartnerBasePageAbility: 0x001

phy1: Network.EthernetPhysicalLayer @ ethernet 1
    Id1: 0x0007
    Id2: 0xC0F1
    AutoNegotiationAdvertisement: 0x00A1
    AutoNegotiationLinkPartnerBasePageAbility: 0x001

touchscreen: Input.FT5336 @ i2c3 0x38
    isRotated: true
    MaxX: 480
    MaxY: 272
    -> gpioPortI@13
可以看到这里定义了两个phy给以太网用,还有一个触摸屏,使用的是i2c3的接口,地址0x38,大小,使用的GPIO
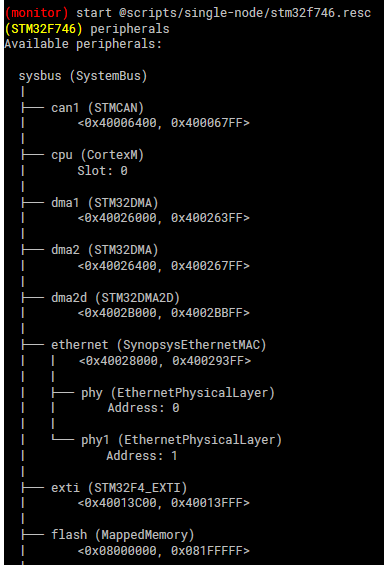
使用外设指令,可以查看当前设备的外设和地址
peripherals
STM32H7 模拟
由于官方没有给h7的resc文件,我们就模仿f7写一个
:name: STM32H743
:description: This script runs demo on STM32H743.

using sysbus
$name?="STM32H743"
mach create $name

# 由于没有h7的board 所以这里用cpu模拟
machine LoadPlatformDescription @platforms/cpus/stm32h743.repl

# 模拟所有串口,注意串口名称可能不同
showAnalyzer usart1
showAnalyzer usart2
showAnalyzer usart3
showAnalyzer uart4
showAnalyzer uart5
showAnalyzer usart6
showAnalyzer uart7
showAnalyzer uart8

$bin ?= @platforms/bin/stm32h743.bin

macro reset
"""
    sysbus LoadELF $bin
"""

runMacro $reset
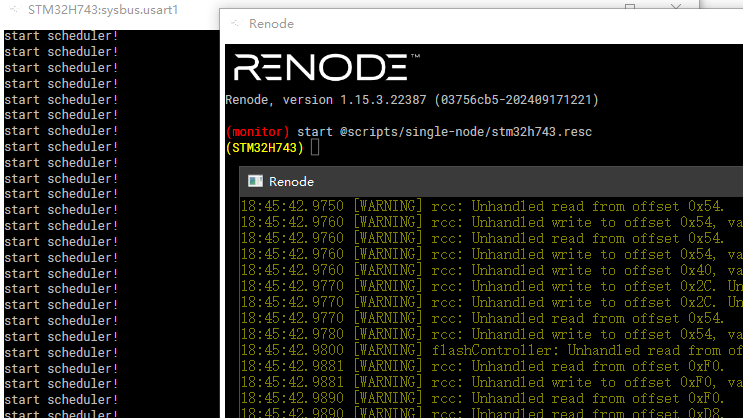
启动测试
start @scripts/single-node/stm32h743.resc
其他指令
Hook
在访问特定外设进行读取后执行 Python 脚本
(machine) sysbus SetHookAfterPeripheralRead gpioPortA "print '%s peripheral has been accessed to read'"
在访问特定外围设备进行写入之前执行 Python 脚本
(machine) sysbus SetHookBeforePeripheralWrite peripheral "print '%s peripheral has been accessed to write'"
include
include可以包含多个模拟器,启动的时候就会都启动,如果是多芯片模拟就比较适合
include @scripts/single-node/quark_c1000.resc
模拟传感器
Renode里有模拟传感器数据的方式,相当于是你给一个数据表,类似CSV结构的,然后指定好接口,频率什么的,硬件就可以直接从这个表中读取到对应的传感器数据了
https://renode.readthedocs.io/en/latest/basic/resd.html
传感器本身的寄存器或者配置,这个机制需要额外去实现,官方有具体的例子
https://github.com/renode/renode-infrastructure/blob/3f1abde88ac5a2dae326b77ab91892f335e78f80/src/Emulator/Peripherals/Peripherals/Sensors/ADXL345.cs
看起来还是比较简单的,就是列出来可能会用到的寄存器,然后实现他的读写,数据寄存器需要额外的一个喂数据接口即可。
大部分外部传感器可以仿照这个来,只要补充寄存器定义和某些返回数据的接口即可
Summary
这个是打印机固件仿真逆向的项目
https://github.com/nviennot/stm32-emulator?tab=readme-ov-file
There’s some existing work in the STM32 emulation space:
- Mini404 emulates the Prusa Mini. Quite a feat. See the project’s hw/arm/prusa for the peripherals.
- Qiling emulates all kinds of devices, including STM32s. It would be a good candidate, but wasn’t fitting the bill because 1) it’s written in Python, and is very slow. 2) It doesn’t support what I really want which is tracing in registers that I care about.
- Renode: Emulate all sorts of devices, written in C#. The configuration files are finicky, and it’s overall pretty slow. I didn’t like it.
- Tinylabs’ flexsoc-cm3: This is Elliot’s project to have the real stm32 peripherals to be accessible directly to a host that is emulating a CPU. I haven’t tried it, but it looks promising.
- Use GDB and single step everything. That might be too slow.
前人的经验,主要是嫌弃模拟比较慢
Proteus的仿真也很常见,但是也只适合小型程序仿真,不适合复杂程序。而且绑定了硬件整体也必须得用Proteus才行,两边要配合起来,实际现实中用的还是比较少。可能是以前的PCB比较贵、周期长,没验证好直接打板成本很高吧,所以才有Proteus的仿真,但是现在速度快、成本低,完全用不到。
https://www.arm.com/zh-TW/products/development-tools/simulation/virtual-hardware
还有一个是ARM官方的虚拟化硬件,不过这个东西没有实例,也不知道具体细节是什么样的
比较复杂的是实现外设仿真,这个部分还得看怎么处理
Quote
https://github.com/silent-rain/stm32f103-tutorial/blob/master/docs/Renode%E4%BB%BF%E7%9C%9F%E6%A8%A1%E6%8B%9F.md