Foreword
宝可梦剑盾的孵蛋,刷极具,刷闪,太麻烦了,极其消耗时间,而且操作极其无脑,基于这种情况呢,搞个可以自动化的手柄是必须的了。
类似工具
https://www.bilibili.com/video/av70119903?from=search&seid=9681067370979596855
之前就已经有报道说使用某usb产品直接奥德赛自动打boss,自动刷金币,而且塞尔达也能用。
这个东西叫 switch up
https://www.switch-up.ca/
基于此,我先问了问客服是否有现成的脚本编辑器或者什么操作可以直接用的,当时自然是没有的,12月3号。
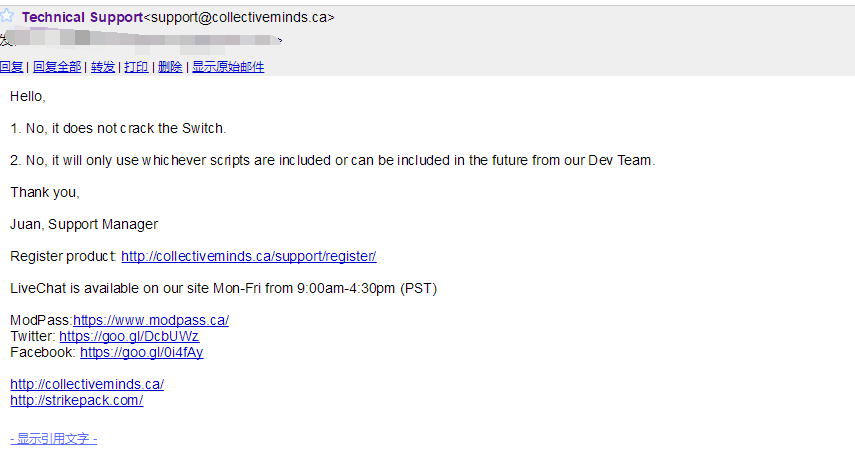
等我做出来的时候呢,我发现他也有了这个功能,不过基本可以确定他的比较麻烦,而且都是出厂刷固件,刷了以后改起来比较麻烦,而且他们硬件也不给API,不给写脚本的接口,想要自己实现任意功能显然是不行的。
https://www.youtube.com/watch?v=2Z0TjO8l6YE
其他轮子
https://github.com/shinyquagsire23/Switch-Fightstick
首先是这个,他呢使用了LUFA的库,然后是通过将图片数据转成对应的switch鼠标的移动位置,从而完成将图片输入到switch中,然后他用的基本都是Arduino 一系的东西,还有一个就是Teensy 2.0++。基本就是靠他这个完成了整个控制的基础。
https://github.com/bertrandom/snowball-thrower
然后就是这位老哥,他是不需要什么外部的图片输入,只需要执行手柄上的按钮就行了,并且他将一系列操作改成了一个类似的srcipt的东西吧,他是实现了下面这些个操作,其实我们还需要几个按钮,home键,不过添加起来就比较简单了,然后他用的是Teensy++ v2.0
typedef enum {
	UP,
	DOWN,
	LEFT,
	RIGHT,
	X,
	Y,
	A,
	B,
	L,
	R,
	THROW,
	NOTHING,
	TRIGGERS
} Buttons_t;
Teensy v2.0搭建
硬件
这里出了个错,本来我也想买Teensy++ v2.0的,然后不小心买错了…买了个Teensy v2.0
Teensy v2.0 淘宝一下,包邮以后基本都是32+,所以买了一个。
但是这个东西太老了,它本身是mini-usb,接了线以后是一个usb-a,如果没有采集卡就必须要转一个typec,找转接头的时候眼瞎了,找了个25的,实际上还有更便宜的
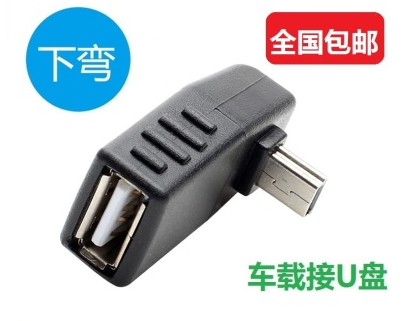
这个头才9.8,有一个这个就能用typec直接接到板子上了,或者是typec直接转mini-usb的也行
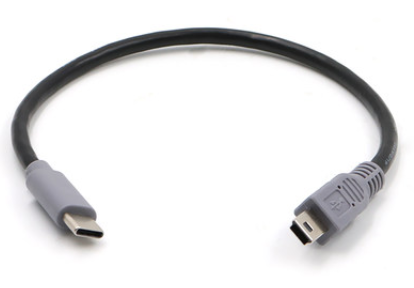
全家照:
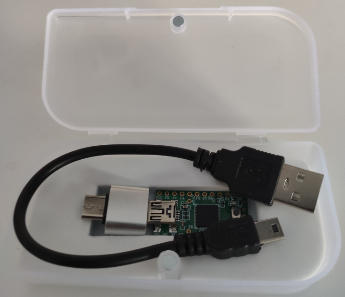
这样就能无论是接采集卡然后usb-a直连,还是用掌机模式typec直连都能用了。
软件环境
首先github上有写怎么搭建环境,但是呢,稍微有点麻烦,而且有些东西完全没必要。
The Teensy Loader
https://www.pjrc.com/teensy/loader.html
这个是烧写软件,必须要有,直接下了就能用
WinAVR
https://sourceforge.net/projects/winavr/files/
这个是编译环境所必须的,虽然这个非常非常老了,2010年的东西,而且也有问题,但是这个比重新搭建AVR Studio还有MinGW等等要方便、快捷的多了。
直接下载,然后安装,安装完成以后还不能直接用,在win10上make会直接报错。
Resource temporarily unavailable
avr-objcopy -O ihex -j .eeprom --set-section-flags=.eeprom="alloc,load" --change-section-lma .eeprom=0 --no-change-warnings Teensy2/Teensy2.elf Teensy2/Teensy2.eep || exit 0
      0 [main] sh 13532 sync_with_child: child 12848(0x1EC) died before initialization with status code 0xC0000142
    190 [main] sh 13532 sync_with_child: *** child state waiting for longjmp
/usr/bin/sh: fork: Resource temporarily unavailable
make: *** [Teensy2/Teensy2.eep] Error 128
由于WinAVR原本/utils/bin中的msys-1.0.dll太老了,64位不兼容,导致编译出错。
所以需要下一个新一些的替换即可正常使用了。
msys-1.0.dll下载链接:
http://www.lab-z.com/wp-content/uploads/2018/10/msys-1.0-vista64.zip
编译报错
如果编译的atmega16u2可能会出现下面的编译报错,主要问题集中在这个clock_div_1没声明。
Joystick.c: In function 'SetupHardware':
Joystick.c:142: warning: implicit declaration of function 'clock_prescale_set'
Joystick.c:142: error: 'clock_div_1' undeclared (first use in this function)
Joystick.c:142: error: (Each undeclared identifier is reported only once
Joystick.c:142: error: for each function it appears in.)
make: *** [obj/Joystick.o] Error 1
这个错主要是,由于WinAVR的版本是2010年的老版本了,所以16u2的宏定义不一样了,需要你补充一个上去。
打开D:\winavr\avr\include\avr目录下的power.h,如下
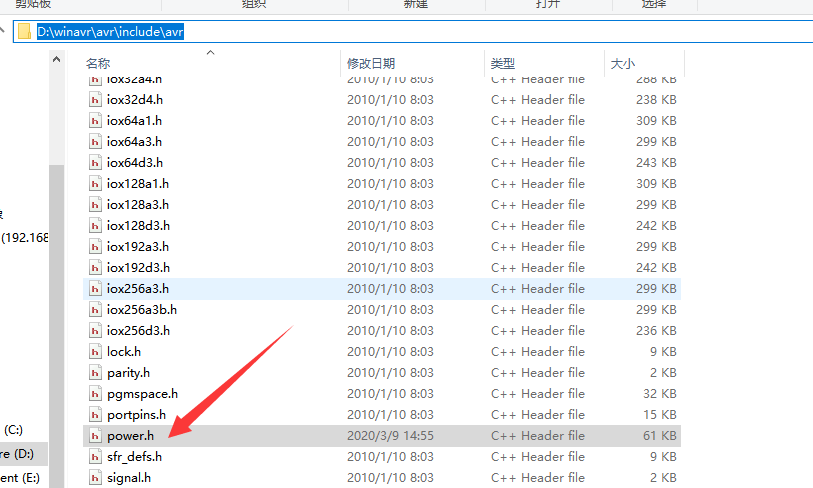
补充上16u2的宏定义,保存一下再make就发现没问题了。
|| defined(__AVR_ATmega16U2__) \
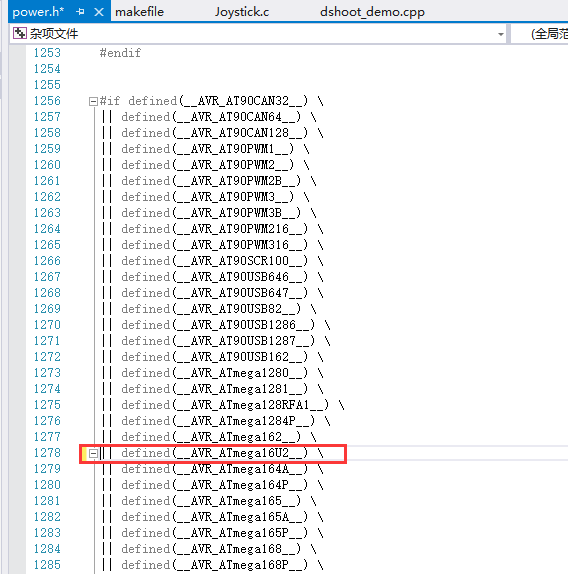
当然还有一种办法,直接把源码中的注释掉,或者直接填个0进去,也是正确的,他默认值本身就是0,都能正常工作,当然如果这里分频真的不同,那就不能用这种取巧的办法了,这里只是临时用用改改而已
//clock_prescale_set(clock_div_1);

clock_prescale_set(0);
原帖方法
原帖是不用WinAVR的,他是要你下一个avr8-gnu-toolchain-win32_x86,这个相当于是对板子的支持,然后还需要你下一个MinGW,这个是相当于你有了make,而WinAVR是将二者打包在了一起,所以比较简单一些,当然可能太老了,有些东西不支持了或者有可能出错,不过那都是后话了。
在这里也能看到,他需要安装的东西和详细的步骤,不过太复杂了,teensy官方支持也只提了WinAVR
https://gbatemp.net/threads/how-to-use-shinyquagsires-splatoon-2-post-printer.479497/
好像现在也有AVR的集成IDE,AVR Studio,类似于keil或VS,直接都弄好,不过我不需要那么复杂的功能,这样就挺好的。
code
修改芯片
由于原工程是Teensy++ v2.0,所以第一步先修改makefile,将其编译为Teensy v2.0
MCU          = atmega32u4
#MCU          = at90usb1286
修改脚本
其逻辑完全在这个step中,前面是相当于一个等待延迟,从第七步开始才是整个循环的脚本内容
static const command step[] = {
	// Setup controller
	{ NOTHING,  250 },
	{ TRIGGERS,   5 },
	{ NOTHING,  150 },
	{ TRIGGERS,   5 },
	{ NOTHING,  150 },
	{ A,          5 },
	{ NOTHING,  250 },

	// Talk to Pondo
	{ A,          5 }, // Start
	{ NOTHING,   30 },
	{ B,          5 }, // Quick output of text
	{ NOTHING,   20 }, // Halloo, kiddums!
	{ A,          5 }, // <- I'll try it!
	{ NOTHING,   15 },
	{ B,          5 },
	{ NOTHING,   20 },
	{ A,          5 }, // <- OK!
	{ NOTHING,   15 },
	{ B,          5 },
	{ NOTHING,   20 }, // Aha! Play bells are ringing! I gotta set up the pins, but I'll be back in a flurry
	{ A,          5 }, // <Continue>
	{ NOTHING,  325 }, // Cut to different scene (Knock 'em flat!)
	{ B,          5 },
	{ NOTHING,   20 },
	{ A,          5 }, // <Continue> // Camera transition takes place after this
	{ NOTHING,   50 },
	{ B,          5 },
	{ NOTHING,   20 }, // If you can knock over all 10 pins in one roll, that's a strike
	{ A,          5 }, // <Continue>
	{ NOTHING,   15 },
	{ B,          5 },
	{ NOTHING,   20 }, // A spare is...
	{ A,          5 }, // <Continue>
	{ NOTHING,  100 }, // Well, good luck
	{ A,          5 }, // <Continue>
	{ NOTHING,  150 }, // Pondo walks away

	// Pick up Snowball (Or alternatively, run to bail in case of a non-strike)
	{ A,          5 },
	{ NOTHING,   50 },
	{ LEFT,      42 },
	{ UP,        80 },
	{ THROW,     25 },

	// Non-strike alternative flow, cancel bail and rethrow
	{ NOTHING,   30 },
	{ B,          5 },
	{ NOTHING,   20 },
	{ B,          5 }, // I have to split dialogue (It's nothing)
	{ NOTHING,   15 },
	{ B,          5 },
	{ NOTHING,   20 },
	{ B,          5 },
	{ NOTHING,  450 },
	{ B,          5 }, // Snowly moly... there are rules!
	{ NOTHING,   20 },
	{ B,          5 },
	{ NOTHING,   20 },
	{ B,          5 }, // Second dialogue
	{ NOTHING,   20 },
	{ DOWN,      10 }, // Return to snowball
	{ NOTHING,   20 },
	{ A,          5 }, // Pick up snowball, we just aimlessly throw it
	{ NOTHING,   50 },
	{ UP,        10 },
	{ THROW,     25 },

	// Back at main flow
	{ NOTHING,  175 }, // Ater throw wait
	{ B,          5 },
	{ NOTHING,   20 },
	{ B,          5 },
	{ NOTHING,   20 },
	{ B,          5 },
	{ NOTHING,   20 },
	{ B,          5 },
	{ NOTHING,   20 },
	{ B,          5 },
	{ NOTHING,   20 },
	{ B,          5 },
	{ NOTHING,   20 },
	{ B,          5 },
	{ NOTHING,   20 },
	{ B,          5 },
	{ NOTHING,   20 },
	{ B,          5 },
	{ NOTHING,   20 },
	{ B,          5 },
	{ NOTHING,   20 },
	{ B,          5 },
	{ NOTHING,   20 },
	{ B,          5 },
	{ NOTHING,   20 },
	{ B,          5 },
	{ NOTHING,   20 }, // To the rewards
	{ B,          5 },
	{ NOTHING,   20 },
	{ B,          5 },
	{ NOTHING,   20 },
	{ B,          5 },
	{ NOTHING,   20 },
	{ B,          5 },
	{ NOTHING,   20 },

	{ B,          5 }, // Wait for 450 cycles by bashing B (Like real players do!)
	{ NOTHING,   20 },
	{ B,          5 },
	{ NOTHING,   20 },
	{ B,          5 },
	{ NOTHING,   20 },
	{ B,          5 },
	{ NOTHING,   20 },
	{ B,          5 },
	{ NOTHING,   20 },
	{ B,          5 },
	{ NOTHING,   20 },
	{ B,          5 },
	{ NOTHING,   20 },
	{ B,          5 },
	{ NOTHING,   20 },
	{ B,          5 },
	{ NOTHING,   20 },
	{ B,          5 },
	{ NOTHING,   20 },
	{ B,          5 },
	{ NOTHING,   20 },
	{ B,          5 },
	{ NOTHING,   20 },
	{ B,          5 },
	{ NOTHING,   20 },
	{ B,          5 },
	{ NOTHING,   20 },
	{ B,          5 },
	{ NOTHING,   20 },
	{ B,          5 },
	{ NOTHING,   20 },
	{ B,          5 },
	{ NOTHING,   20 },
	{ B,          5 },
	{ NOTHING,   20 } // Saving, intermission
};
大概知道了以后就可以编写自己的脚本了
下面这个是他的操作列表,这里他支持了Throw和triggers什么的,其实就是按住不放,然后放开这样的操作
typedef enum {
	UP,
	DOWN,
	LEFT,
	RIGHT,
	X,
	Y,
	A,
	B,
	L,
	R,
	THROW,
	NOTHING,
	TRIGGERS
} Buttons_t;
在Joystick.h中有支持的所有按键,这里就能按+、-、home、截图等按钮了
// Type Defines
// Enumeration for joystick buttons.
typedef enum {
	SWITCH_Y       = 0x01,
	SWITCH_B       = 0x02,
	SWITCH_A       = 0x04,
	SWITCH_X       = 0x08,
	SWITCH_L       = 0x10,
	SWITCH_R       = 0x20,
	SWITCH_ZL      = 0x40,
	SWITCH_ZR      = 0x80,
	SWITCH_MINUS   = 0x100,
	SWITCH_PLUS    = 0x200,
	SWITCH_LCLICK  = 0x400,
	SWITCH_RCLICK  = 0x800,
	SWITCH_HOME    = 0x1000,
	SWITCH_CAPTURE = 0x2000,
} JoystickButtons_t;
操作处理
增加了按键或者操作都需要在GetNextReport中实现对应的操作流程
// Prepare the next report for the host.
void GetNextReport(USB_JoystickReport_Input_t* const ReportData) {

	// Prepare an empty report
	memset(ReportData, 0, sizeof(USB_JoystickReport_Input_t));
	ReportData->LX = STICK_CENTER;
	ReportData->LY = STICK_CENTER;
	ReportData->RX = STICK_CENTER;
	ReportData->RY = STICK_CENTER;
	ReportData->HAT = HAT_CENTER;

	// Repeat ECHOES times the last report
	if (echoes > 0)
	{
		memcpy(ReportData, &last_report, sizeof(USB_JoystickReport_Input_t));
		echoes--;
		return;
	}

	// States and moves management
	switch (state)
	{

		case SYNC_CONTROLLER:
			state = BREATHE;
			break;

		// case SYNC_CONTROLLER:
		// 	if (report_count > 550)
		// 	{
		// 		report_count = 0;
		// 		state = SYNC_POSITION;
		// 	}
		// 	else if (report_count == 250 || report_count == 300 || report_count == 325)
		// 	{
		// 		ReportData->Button |= SWITCH_L | SWITCH_R;
		// 	}
		// 	else if (report_count == 350 || report_count == 375 || report_count == 400)
		// 	{
		// 		ReportData->Button |= SWITCH_A;
		// 	}
		// 	else
		// 	{
		// 		ReportData->Button = 0;
		// 		ReportData->LX = STICK_CENTER;
		// 		ReportData->LY = STICK_CENTER;
		// 		ReportData->RX = STICK_CENTER;
		// 		ReportData->RY = STICK_CENTER;
		// 		ReportData->HAT = HAT_CENTER;
		// 	}
		// 	report_count++;
		// 	break;

		case SYNC_POSITION:
			bufindex = 0;


			ReportData->Button = 0;
			ReportData->LX = STICK_CENTER;
			ReportData->LY = STICK_CENTER;
			ReportData->RX = STICK_CENTER;
			ReportData->RY = STICK_CENTER;
			ReportData->HAT = HAT_CENTER;


			state = BREATHE;
			break;

		case BREATHE:
			state = PROCESS;
			break;

		case PROCESS:

			switch (step[bufindex].button)
			{

				case UP:
					ReportData->LY = STICK_MIN;
					break;

				case LEFT:
					ReportData->LX = STICK_MIN;
					break;

				case DOWN:
					ReportData->LY = STICK_MAX;
					break;

				case RIGHT:
					ReportData->LX = STICK_MAX;
					break;

				case A:
					ReportData->Button |= SWITCH_A;
					break;

				case B:
					ReportData->Button |= SWITCH_B;
					break;

				case R:
					ReportData->Button |= SWITCH_R;
					break;

				case THROW:
					ReportData->LY = STICK_MIN;
					ReportData->Button |= SWITCH_R;
					break;

				case TRIGGERS:
					ReportData->Button |= SWITCH_L | SWITCH_R;
					break;

				default:
					ReportData->LX = STICK_CENTER;
					ReportData->LY = STICK_CENTER;
					ReportData->RX = STICK_CENTER;
					ReportData->RY = STICK_CENTER;
					ReportData->HAT = HAT_CENTER;
					break;
			}

			duration_count++;

			if (duration_count > step[bufindex].duration)
			{
				bufindex++;
				duration_count = 0;
			}


			if (bufindex > (int)( sizeof(step) / sizeof(step[0])) - 1)
			{

				// state = CLEANUP;

				bufindex = 7;
				duration_count = 0;

				state = BREATHE;

				ReportData->LX = STICK_CENTER;
				ReportData->LY = STICK_CENTER;
				ReportData->RX = STICK_CENTER;
				ReportData->RY = STICK_CENTER;
				ReportData->HAT = HAT_CENTER;


				// state = DONE;
//				state = BREATHE;

			}

			break;

		case CLEANUP:
			state = DONE;
			break;

		case DONE:
			#ifdef ALERT_WHEN_DONE
			portsval = ~portsval;
			PORTD = portsval; //flash LED(s) and sound buzzer if attached
			PORTB = portsval;
			_delay_ms(250);
			#endif
			return;
	}

	// // Inking
	// if (state != SYNC_CONTROLLER && state != SYNC_POSITION)
	// 	if (pgm_read_byte(&(image_data[(xpos / 8) + (ypos * 40)])) & 1 << (xpos % 8))
	// 		ReportData->Button |= SWITCH_A;

	// Prepare to echo this report
	memcpy(&last_report, ReportData, sizeof(USB_JoystickReport_Input_t));
	echoes = ECHOES;

}
这样简单的自动手柄就完成了
进入文件夹目录,直接make,就可以正常编译通过了。
如果有问题,记得先清除上次编译
make clean
如果增加了文件需要对应修改makefile.core.mk
0风险
这种方式本身是模拟的Pokken Tournament Pro Pad 这个手柄的操作,并在这个基础上增加了switch特有的按键。所有操作都相当于是手柄的物理操作,所以基本上是0风险,并且这个东西是不能会被检测的,相当于是物理外挂。很久很久以前按键精灵被针对的时候也出过类似的东西,就是将操作完全写到鼠标或者键盘里,直接模拟真实的鼠标或者键盘操作,从而躲过各种游戏的检测。
The end
https://github.com/elmagnificogi/nintendo_switch_auto_ctrl_script
我的项目地址,后面有空再继续完善一下,或者转而使用树莓派来做这个事情也可以,可以直接通过网络或者usb连接,然后传输多个脚本,并且能通过按钮什么的选择执行的脚本,那样会更方便一些吧
最后是我的NS群:
NS宝可梦剑盾 一群 490570154 二群车主群27775142 三群伊机控单片机群946057081 四群乱数讨论群 755843002 五群动森岛主群383218664 六群不思议的皇冠1158816209,七群宝可梦大集结300155660
Quote
https://medium.com/@bertrandom/automating-zelda-3b37127e24c8
https://gbatemp.net/threads/tutorial-printing-spla2n-posts-with-an-arduino-teensy-board.482166/
http://www.lab-z.com/winavrwin10/