Foreword
有时候用cmd或者bat脚本来调用python或者打包解压某些文件在不同系统不同权限的情况下就很麻烦,很多地方搞不清楚,导致实际体验极差,功能又受限制,看起还贼low,所以打算弄个安装打包程序,完成一些程序的安装或者解压。
之前因为python混淆介绍过一次python的打包工具,这次使用Inno Setup来打包python程序,用来给小白安装插件或者其他程序,非常好用。
环境
- Windows 10
- Inno Setup 6.0.5
- 管理员权限
- 64位,unicode,全中文
Inno Setup 介绍
http://elmagnifico.tech/2017/07/31/Python-VS2017-Pyinstaller/
官网,目前最新版本是 Inno Setup 6.0.5 我也是基于这个来写的安装脚本。
Inno Setup目前安装界面比较传统吧,但是不算老掉牙,老掉牙的历史版本也有。
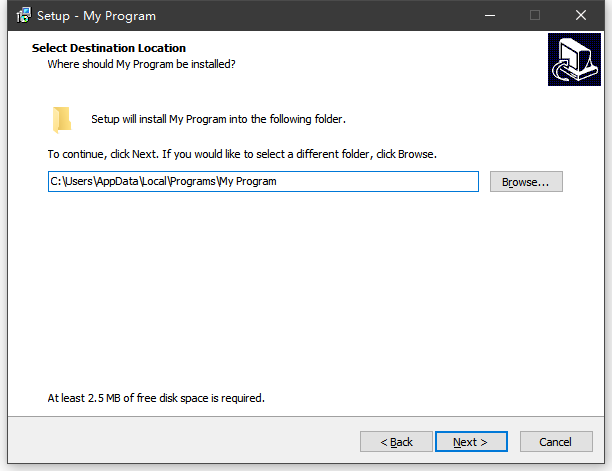
但是胜在简单,很多逻辑简单的程序基本都可以一键通过配置向导直接配置完成。
配置向导
通过文件新建一个项目,就会自动弹出配置向导,一步步操作,就可以生成一个简单的配置脚本。
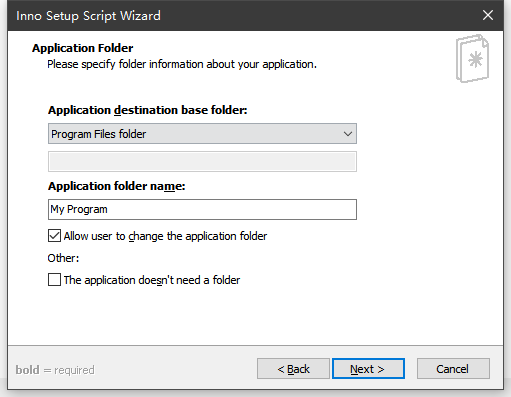
但是这个简单的配置脚本,还是有点简单了,很多情况没处理,所以我基于基础配置脚本,又增加了一些其他方面的配置,相当于是一个例程了
配置脚本
由于网上的一些脚本,实际要么很老了,要么针对的环境不同,可能用了无效,所以这里记录分享一下
; Script generated by the Inno Setup Script Wizard.
; SEE THE DOCUMENTATION FOR DETAILS ON CREATING INNO SETUP SCRIPT FILES!

#define MyAppName "我的程序"
#define MyAppVersion "1.0"
#define MyAppPublisher "elmagnifico"
#define MyAppURL "http://elmagnifico.tech"

[Setup]
; NOTE: The value of AppId uniquely identifies this application. Do not use the same AppId value in installers for other applications.
; (这里的UUID最好通过界面上的Tools重新生成一个,不要冲突了.)
AppId={{1FCACEB7-E85E-417D-B356-51756222E15E}
AppName={#MyAppName}
AppVersion={#MyAppVersion}
;AppVerName={#MyAppName} {#MyAppVersion}
AppPublisher={#MyAppPublisher}
AppPublisherURL={#MyAppURL}
AppSupportURL={#MyAppURL}
AppUpdatesURL={#MyAppURL}
DefaultDirName={autopf}\{#MyAppName}
; 我这里关闭了,用户选择安装路径的页面,因为我是固定位置安装的
DisableDirPage=yes
DefaultGroupName={#MyAppName}
DisableProgramGroupPage=yes
; 指定安装前的提示文本
InfoBeforeFile=.\InfoBeforeFile.txt
; 指定安装后的提示文本
InfoAfterFile=.\InfoAfterFile.txt
; 这里默认使用管理权限启动,否则无法安装
; Uncomment the following line to run in non administrative install mode (install for current user only.)
;PrivilegesRequired=lowest
; 这里是指输出的exe的名字
OutputBaseFilename=我的程序
; 安装程序的图标
SetupIconFile=.\logo.ico
; 安装程序需要密码,也可以不要
Password=dmd2020
Compression=lzma
SolidCompression=yes
; 这里是安装向导的UI样式,也可以切到上古模式
WizardStyle=modern
; 如果需要在安装后完成环境变量的修改,那么需要配置
ChangesEnvironment=true

; 安装前可选语言
[Languages]
Name: "en"; MessagesFile: "compiler:Default.isl";
; 这里的中文ChineseSimplified.isl是从官方下载的第三方翻译
Name: "chinesesimplified"; MessagesFile: "compiler:Languages\ChineseSimplified.isl"

[Files]
;Source 是指实际需要被打包的文件,excludes是排除的文件,DestDir是指安装的目录
Source: "..\Output\*"; Excludes: "*.zip"; DestDir: "{userdocs}\maya\2017\plug-ins"; Flags: ignoreversion recursesubdirs createallsubdirs
Source: "..\Dmd_setup.py"; DestDir: "{userdocs}\maya\2017\plug-ins"; Flags: ignoreversion
; NOTE: Don't use "Flags: ignoreversion" on any shared system files

[Dirs]
Name: {code:GetDataDir}; Flags: uninsneveruninstall

[run]
; 当程序安装完成以后,运行的脚本或者其他程序,我这里就是通过mayapy来运行一个安装脚本,执行python程序,并且传入了2额外个参数
Filename: "{code:GetDataDir}\bin\mayapy.exe"; Parameters: "{userdocs} {code:GetDataDir} {%USERPROFILE}"; Check: CheckOnline;
;check用来做一个判定,是否执行这个安装后命令,结合下面的程序判断

[Code]
{代码部分,语法参考Pascal语法,上古语言,能查到的东西不是很多吧,这里被用作了Inno的脚本语言}
{ set maya path page}
var
  DataDirPage: TInputDirWizardPage;

function GetDataDir(Param: String): String;
begin
  { Return the selected DataDir }
  Result := DataDirPage.Values[0];
end;

{这部分程序是用来检测是否某个程序正在运行,如果在运行那么会提示关闭,然后退出安装}
function IsAppRunning(const FileName : string): Boolean;
var
  FSWbemLocator: Variant;
  FWMIService   : Variant;
  FWbemObjectSet: Variant;
begin
  Result := false;
  FSWbemLocator := CreateOleObject('WBEMScripting.SWBEMLocator');
  FWMIService := FSWbemLocator.ConnectServer('', 'root\CIMV2', '', '');
  FWbemObjectSet := FWMIService.ExecQuery(Format('SELECT Name FROM Win32_Process Where Name="%s"',[FileName]));
  Result := (FWbemObjectSet.Count > 0);
  FWbemObjectSet := Unassigned;
  FWMIService := Unassigned;
  FSWbemLocator := Unassigned;
end;

function InitializeSetup(): Boolean;
begin
 Result := IsAppRunning('maya.exe');
  if Result then
    begin
      MsgBox('当前maya正在运行中,请先关闭程序后再重试! ', mbError, MB_OK);
      result:=false;
    end
  else
    begin
      result := true;
    end;
end;

{这里相当于是一个自定义页面,用来选择安装方式,其他页面可以参考如下的方式进行配置}
var
  Page: TWizardPage;
  Online: Boolean;
  RadioButton1, RadioButton2: TRadioButton;
  Lbl1, Lbl2: TNewStaticText;


procedure CreateAddonPage;
begin
  Page := CreateCustomPage(wpInfoBefore, '选择安装方式', '请根据您的情况选择安装方式');

  RadioButton1 := TRadioButton.Create(Page);
  RadioButton1.Left := ScaleX(80);
  RadioButton1.Top := ScaleY(40);
  RadioButton1.Width := Page.SurfaceWidth;
  RadioButton1.Height := ScaleY(17);
  RadioButton1.Caption := '联网安装';
  RadioButton1.Checked := True;
  RadioButton1.Parent := Page.Surface;

  Lbl1 := TNewStaticText.Create(Page);
  Lbl1.Left := ScaleX(95);
  Lbl1.Top := ScaleY(60);
  Lbl1.Width := ScaleX(250);
  Lbl1.Height := ScaleY(50);
  Lbl1.Caption := '必须联网才能安装,否则无法正常工作';
  Lbl1.Parent := Page.Surface;

  RadioButton2 := TRadioButton.Create(Page);
  RadioButton2.Left := ScaleX(80);
  RadioButton2.Top := RadioButton1.Top + ScaleY(60);
  RadioButton2.Width := Page.SurfaceWidth;
  RadioButton2.Height := ScaleY(17);
  RadioButton2.Caption := '离线安装';
  RadioButton2.Checked := false;
  RadioButton2.Parent := Page.Surface;

  Lbl2 := TNewStaticText.Create(Page);
  Lbl2.Left := ScaleX(95);
  Lbl2.Top := Lbl1.Top + ScaleY(60);
  Lbl2.Width := ScaleX(250);
  Lbl2.Height := ScaleY(50);
  Lbl2.Caption := '离线模式安装,建议经验丰富的用户使用';
  Lbl2.Parent := Page.Surface;
end;

{这个函数是Inno的接口,用来处理用户事件的,这里就把前面的自定义页面加进去了}
procedure InitializeWizard();
begin
{因为关闭了用户自定义安装路径,所以这里加了一个让用户选择已有安装路径的页面}
DataDirPage := CreateInputDirPage(wpSelectDir,
  '选择已有安装路径', '快速查找安装路径:右键桌面图标,打开文件所在位置',
  '这里选择安装路径,比如 C:\Program Files\ 或者类似路径 D:\Autodesk\Maya2019',
  False, '');
DataDirPage.Add('');
{安装模式选择的自定义页面}
CreateAddonPage;
end;

{这里主要是用来处理安装完运行的check逻辑}
function ShouldSkipPage(PageID: Integer): Boolean;
begin
  {Log('PageID:'+IntToStr(PageID)); }
  if (PageID = 101) or (PageID = 100) then
    begin
    if RadioButton1.Checked then
      begin
      Online := true;
      end
    else
      begin
      Online := false;
      end;
    end;
end;

function CheckOnline: Boolean;
begin
  Result := Online;
end;
安装后运行,也可以通过这个接口实现,其中Log是Inno的自带API,可以打印安装过程中的debug信息
procedure CurStepChanged(CurStep: TSetupStep);
begin
  if CurStep = ssPostInstall then
  begin
    Log('Post install');
    {llAfterInstall(platform);}
    {SetEnvPath();}
    MsgBox('test! ', mbError, MB_OK);
  end;
end;
坑点
有些地方可能会遇到坑,大概写一下
多语言
ChineseSimplified.isl 下载地址,其他语言也有
https://jrsoftware.org/files/istrans/
权限
由于很多外部程序运行的时候需要外部环境变量或者外部的运行位置或者是文件权限支持,这个时候最好默认使用管理员权限来编译安装包,否则用户可能会出现某个程序没有读写权限然后报错。(由于windows的权限不明确,而且各种小白用户乱用,导致最后统一管理员权限成了唯一解决办法,但是这就造成了实际很多程序捆绑一堆垃圾但是你毫无办法,不允许这个程序就没法用)
设置环境变量
很多现成的脚本目前看来基本都不能用,在运行过程中增加或者减少环境变量,或者是安装完以后设置环境变量,并且生效,我这里试过基本都不行,原因未知,反正是不生效。
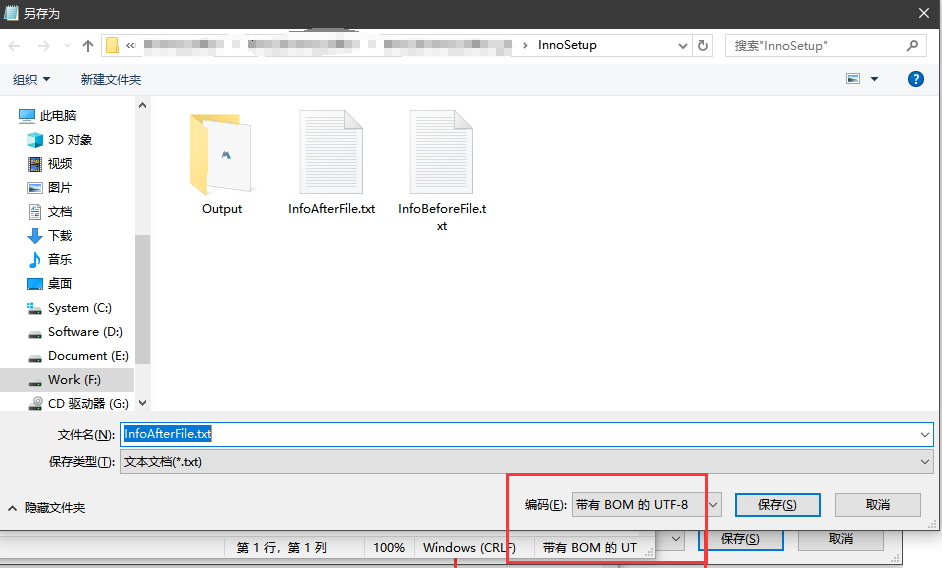
中文文本
inno是支持中文,也就是unicode,但是支持的txt有点奇怪,代码中要显示安装前后文本都必须是带Bom的unicode文本,否则中文会出现乱码的情况
; 指定安装前的提示文本
InfoBeforeFile=.\InfoBeforeFile.txt
; 指定安装后的提示文本
InfoAfterFile=.\InfoAfterFile.txt
然而inno的iss文件自身却是个得用gbk解码中文的文件格式
Summary
我只是用来解压部分python文件到系统指定目录中,并且让用户选择了已有python目录,最后运行一段python程序,相对比较简单
inno本身支持插件或者dll之类的,可以做出来非常现代化的安装UI,不过嘛,既然都上这么复杂的东西了,那我直接用 c# 或者 QT 或者 python 直接写一个安装程序那也不是很困难,而且每个界面都能定制,可控变量也多,不是更好吗?
所以感觉不会再多研究inno了,基本到这里就够用了。
Quote
https://www.cnblogs.com/atuo/p/4777654.html
https://blog.csdn.net/zqyo2000z/article/details/79169669
https://www.cnblogs.com/joean/p/4843136.html
https://www.cnblogs.com/xiurui12345/archive/2013/05/21/3091175.html
https://www.cnblogs.com/kybs0/p/10340824.html
https://www.cnblogs.com/pengsn/p/13377477.html
https://blog.csdn.net/LJianDong/article/details/103580332
https://stackoverflow.com/questions/14674077/inno-setup-how-to-watch-variables-values-or-write-to-debug-output