Foreword
最近v2ray爆出来了几个漏洞,引发热议.
https://github.com/v2ray/v2ray-core/issues/2542
对应的我也发现之前一直用的默认vmess协议端口一直被阻断,并且从qexw到阿里云都会被阻断,判定应该不是服务器的问题,应该是被检测到了屏蔽端口了,所以也有必要针对性的改变一下目前的协议了。
好久都没关注v2ray,没想到连仓库都要改了,现在改成v2fly了,然后v2要重构了,期待后续的新版本吧
https://github.com/v2fly/v2ray-core
VPS
之前用的qexw,真的垃圾,开始的时候还没有这么多问题,大概半年以后开始经常断流,经常莫名其妙就连不上了,日常被攻击,然后其中有一次竟然我IP还重了,然后我被强行换IP,强行换路由,换协议,原本ping只有13左右,被换以后变成45,没有任何解释。
除了这个以外,速度被限制成傻逼,说是什么2小时占满宽带会被封,尼玛我就从来都没有跑满过,测速都只能测出来30M。亏我还年付了,然后最后整体降配,说不服就退款,然后退款告诉我按9个月(无优惠)算无款可退,真没见过这样的,私自降配不通知不提醒,然后退款还按无优惠计算,真的是无良商家。
然后遇到了阿里云国际新加坡2.5刀,30M,轻松跑满,甚至超过,延迟也只有40+,非常舒服,但是由于内存不够用ttrss和v2ray同时跑,有时候就会直接内存耗尽死机了,只能重启,还是有点烦。
最后遇到了GreenCloud的日本大盘鸡,总体比较便宜,虽然ping稍微有点高,90+,但是1c1g,200g ssd,1t端口,1t流量,然后年付33.6刀,还是可以的,正好打算自己弄个图床给blog和笔记用,正好可以,后面ttrss也可以转移到这里来,然后实测速度其实也就是10-40M左右.
V2ray WS TLS
目前官方推荐的协议组合方式:
-
VMess over Websocket with TLS
- VMess over TLS
- VMess over HTTP/2 (使用 TLS 的 HTTP/2,并非 h2c)
- Shadowsocks(AEAD) over Websocket with TLS
简单说都是基于TLS了,而要TLS就必须得有域名,得有个反代,这里我就用Nginx,其他反代应该也可以.
而由于必须要有证书,所以这里使用自动证书机器人Certbot,自动签发Let’s Encrypt的免费证书,只是需要三个月一续,机器人自动帮忙搞定
Certbot
https://certbot.eff.org/
下载,假如已经有了Nginx,先关闭一下
wget https://dl.eff.org/certbot-auto
chmod a+x certbot-auto
service nginx stop
安装,并根据提示生成证书
./certbot-auto certonly
由于我不想走提示,所以直接使用下面的命令,直接生成我的证书
./certbot-auto certonly --standalone --email xxx@xxx.com --agree-tos -d www.xxx.com
比如:
./certbot-auto certonly --standalone --email elmagnificogg@gmail.com --agree-tos -d img.elmagnifico.tech
然后这里要记录一下生成的证书所在位置
IMPORTANT NOTES:
 - Congratulations! Your certificate and chain have been saved at:
   /etc/letsencrypt/live/img.elmagnifico.tech/fullchain.pem
   Your key file has been saved at:
   /etc/letsencrypt/live/img.elmagnifico.tech/privkey.pem
   Your cert will expire on 2020-09-05. To obtain a new or tweaked
   version of this certificate in the future, simply run certbot-auto
   again. To non-interactively renew *all* of your certificates, run
   "certbot-auto renew"
 - Your account credentials have been saved in your Certbot
   configuration directory at /etc/letsencrypt. You should make a
   secure backup of this folder now. This configuration directory will
   also contain certificates and private keys obtained by Certbot so
   making regular backups of this folder is ideal.
 - If you like Certbot, please consider supporting our work by:

   Donating to ISRG / Let's Encrypt:   https://letsencrypt.org/donate
   Donating to EFF:                    https://eff.org/donate-le
比如这里的:
/etc/letsencrypt/live/img.elmagnifico.tech/fullchain.pem 证书所在 /etc/letsencrypt/live/img.elmagnifico.tech/privkey.pem 密钥所在
然后添加定时任务,自动renew证书
crontab -e

添加如下内容:
SHELL=/bin/bash
BASH_ENV=/root/.bashrc

0 3 1 * * service nginx stop
1 3 1 * * /root/certbot-auto renew --renew-hook "sudo nginx -s reload" && service nginx start
这个表示每月1号.凌晨3点自动执行renew,自动续期,并且重新加载nginx
然后就是开始配置Nginx了
2021.3.11更新:这里把nginx启动和renew分开了,写同一行执行的时候总是hook出问题,所以分成两步走
Nginx
默认源中没有nginx,所以先添加官方源
rpm -ivh http://nginx.org/packages/centos/7/noarch/RPMS/nginx-release-centos-7-0.el7.ngx.noarch.rpm
安装
yum install nginx -y
开机自动启动
systemctl enable nginx
查找配置文件所在,并修改配置文件
nginx -t
nginx: the configuration file /etc/nginx/nginx.conf syntax is ok
nginx: configuration file /etc/nginx/nginx.conf test is successful
vi /etc/nginx/nginx.conf
nginx配置大概是这样的:
# For more information on configuration, see:
#   * Official English Documentation: http://nginx.org/en/docs/
#   * Official Russian Documentation: http://nginx.org/ru/docs/

user nginx;
worker_processes auto;
error_log /var/log/nginx/error.log;
pid /run/nginx.pid;

# Load dynamic modules. See /usr/share/doc/nginx/README.dynamic.
include /usr/share/nginx/modules/*.conf;

events {
    worker_connections 1024;
}

http {
    log_format  main  '$remote_addr - $remote_user [$time_local] "$request" '
                      '$status $body_bytes_sent "$http_referer" '
                      '"$http_user_agent" "$http_x_forwarded_for"';

    access_log  /var/log/nginx/access.log  main;

    sendfile            on;
    tcp_nopush          on;
    tcp_nodelay         on;
    keepalive_timeout   65;
    types_hash_max_size 2048;

    include             /etc/nginx/mime.types;
    default_type        application/octet-stream;

    # Load modular configuration files from the /etc/nginx/conf.d directory.
    # See http://nginx.org/en/docs/ngx_core_module.html#include
    # for more information.
    include /etc/nginx/conf.d/*.conf;

    server {
        listen       80 default_server;
        listen       [::]:80 default_server;
        server_name  你的域名;
        root         /usr/share/nginx/html;

        # Load configuration files for the default server block.
        include /etc/nginx/default.d/*.conf;

        location / {
        }

        error_page 404 /404.html;
            location = /40x.html {
        }

        error_page 500 502 503 504 /50x.html;
            location = /50x.html {
        }
    }

# Settings for a TLS enabled server.

    server {
        listen       443 ssl http2 default_server;
        listen       [::]:443 ssl http2 default_server;
        server_name  你的域名;
        root         /usr/share/nginx/html;

        ssl_certificate "你的证书位置";
        ssl_certificate_key "你的密钥位置";
        ssl_session_cache shared:SSL:1m;
        ssl_session_timeout  10m;
        ssl_ciphers HIGH:!aNULL:!MD5;
        ssl_prefer_server_ciphers on;

        # Load configuration files for the default server block.
        include /etc/nginx/default.d/*.conf;

        location /v2ray {#这个位置和v2ray中的相同
        proxy_redirect off;
        proxy_pass http://127.0.0.1:43968; #此IP地址和端口需要和v2ray中监听的端口保持一致,
        proxy_http_version 1.1;
        proxy_set_header Upgrade $http_upgrade;
        proxy_set_header Connection "upgrade";
        proxy_set_header Host $http_host;
        }

        error_page 404 /404.html;
            location = /40x.html {
        }

        error_page 500 502 503 504 /50x.html;
            location = /50x.html {
        }
    }

}
修改完成以后,启动nginx,然后通过域名登陆一下,看看http和https是否可以看到对应主页,都能看到说明nginx启动成功了
sudo systemctl start nginx
V2ray
首先这里v2ray的配置文件的json和以前其实格式上有很多不同了,这里更新一下以前的配置
{
  "log": {
    "access": "/var/log/v2ray/access.log",
    "error": "/var/log/v2ray/error.log",
    "loglevel": "warning"
  },
  "dns": {},
  "stats": {},
  "inbounds": [
  	  # 老配置了,不推荐使用
      {
      "port": 43969,
      "protocol": "vmess",
      "settings": {
        "clients": [
          {
            "id": "22769f07-8eda-4b14-aa6e-7ac7c476f4a2",
            "alterId": 32
          },
          {
            "id": "8ab40c50-2af9-43b1-96bb-2f48189a9f4c",
            "alterId": 32
          }
        ]
      },
      "tag": "in-0",
      "streamSettings": {
        "network": "tcp",
        "security": "none",
        "tcpSettings": {}
      }
    },
  	# 老配置了,不推荐使用
    {
      "port": 1207,
      "protocol": "shadowsocks",
      "settings": {
        "method": "aes-256-cfb",
        "password": "password",
        "level": 0,
        "ota": false,
        "network": "tcp,udp"
      },
      "tag": "in-1",
      "streamSettings": {
        "network": "tcp",
        "security": "none",
        "tcpSettings": {}
      }
    },
    # 推荐使用
    {
      "port": 43968,##这里和nginx一样
      "listen": "127.0.0.1",
      "protocol": "vmess",
      "settings": {
        "clients": [
          {
            "id": "4072f202-53d2-466a-9432-83ec3a219345",
            "alterId": 32
          }
        ]
      },
      "tag": "in-2",
      "streamSettings": {
        "network": "ws",
        "wsSettings":{
                "path":"/v2ray" #这里和nginx一样
        }
      }
    }
  ],
  "outbounds": [
    {
      "tag": "direct",
      "protocol": "freedom",
      "settings": {}
    },
    {
      "tag": "blocked",
      "protocol": "blackhole",
      "settings": {}
    }
  ],
  "routing": {
    "domainStrategy": "AsIs",
    "rules": [
      {
        "type": "field",
        "ip": [
          "geoip:private"
        ],
        "outboundTag": "blocked"
      }
    ]
  },
  "policy": {},
  "reverse": {},
  "transport": {}
}
可以使用下面的命令来检查你写的json格式是否正确:
/usr/bin/v2ray/v2ray -test -config /etc/v2ray/config.json
没有错的情况下,重启v2ray,尝试连接
systemctl restart v2ray
然后配置好客户端以后基本就能用了
自建订阅
首先,从v2rayN中挑选需要建立的订阅的服务器
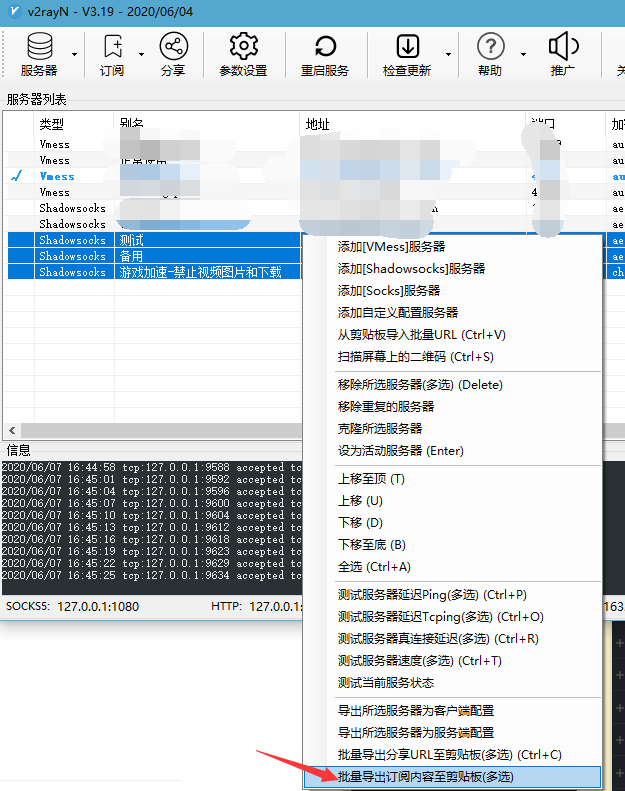
然后要有OneDrive,这个比较简单
在OneDrive中建立一个txt,然后复制刚才的内容进去,保存,关闭
右键-在线查看,在网页端查看该文件,共享,不允许编辑,获取链接
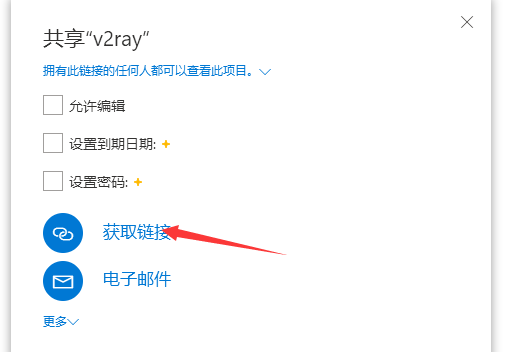
将得到的链接输入到下面的网址中,然后得到永久链接
https://onedrive.gimhoy.com/
这样这个永久链接就可以作为V2ran的订阅链接,日后只需要修改文件内容,就可以自动订阅了

还是非常方便的
Summary
总体就是这些了
Quote
https://github.com/v2ray/v2ray-core/issues/2542
https://doubibackup.com/v2ray-ws-tls-nginx.html
https://www.jianshu.com/p/d88e19c8963b
https://zhuanlan.zhihu.com/p/53407930?from_voters_page=true