Foreword
简单说,想测试一下这个APF模拟程序,然后仔细看了一下,虽然是python和c++,但是实际上他是在linux环境里编译的,因为不确定效果如何,也懒得把他们转成windows下的,就想着直接用ubuntu直接编译,看看效果如何。
https://github.com/Swarm-IITKgp/APF-Simulator
然后就被坑了半天,OpenCV实在是太恶心了,装了老半天。
环境
- ubuntu 20.04,最终成功了
- ubuntu 16.04,依赖混乱,直接失败了
- OpenCV 2.4.13.6
- python2.7
- pip 20.3.4
切换软件源
默认源太慢了,先备份老的源
sudo cp /etc/apt/sources.list /etc/apt/sources.list.bak
sudo vi /etc/apt/sources.list
然后替换成下面的内容
#添加阿里源
deb http://mirrors.aliyun.com/ubuntu/ focal main restricted universe multiverse
deb-src http://mirrors.aliyun.com/ubuntu/ focal main restricted universe multiverse
deb http://mirrors.aliyun.com/ubuntu/ focal-security main restricted universe multiverse
deb-src http://mirrors.aliyun.com/ubuntu/ focal-security main restricted universe multiverse
deb http://mirrors.aliyun.com/ubuntu/ focal-updates main restricted universe multiverse
deb-src http://mirrors.aliyun.com/ubuntu/ focal-updates main restricted universe multiverse
deb http://mirrors.aliyun.com/ubuntu/ focal-proposed main restricted universe multiverse
deb-src http://mirrors.aliyun.com/ubuntu/ focal-proposed main restricted universe multiverse
deb http://mirrors.aliyun.com/ubuntu/ focal-backports main restricted universe multiverse
deb-src http://mirrors.aliyun.com/ubuntu/ focal-backports main restricted universe multiverse
#添加清华源
deb https://mirrors.tuna.tsinghua.edu.cn/ubuntu/ focal main restricted universe multiverse
# deb-src https://mirrors.tuna.tsinghua.edu.cn/ubuntu/ focal main restricted universe multiverse
deb https://mirrors.tuna.tsinghua.edu.cn/ubuntu/ focal-updates main restricted universe multiverse
# deb-src https://mirrors.tuna.tsinghua.edu.cn/ubuntu/ focal-updates main restricted universe multiverse
deb https://mirrors.tuna.tsinghua.edu.cn/ubuntu/ focal-backports main restricted universe multiverse
# deb-src https://mirrors.tuna.tsinghua.edu.cn/ubuntu/ focal-backports main restricted universe multiverse
deb https://mirrors.tuna.tsinghua.edu.cn/ubuntu/ focal-security main restricted universe multiverse
# deb-src https://mirrors.tuna.tsinghua.edu.cn/ubuntu/ focal-security main restricted universe multiverse multiverse
Python2.7部分
首先,要安装python2.7,这个比较简单,没啥问题
sudo apt-get install python2.7
pip
然后就是pip,这里不能直接用下面的方式来装
sudo apt-get install python-pip
因为众所周知的python2.7下线了,这样安装会直接提示不存在这个库
所以要从脚本里直接拉,先安装一个curl,然后把脚本下下来
sudo apt-get curl
curl https://bootstrap.pypa.io/pip/2.7/get-pip.py --output get-pip.py
python2.7 ./get-pip.py
- 注意这里不要从这里拉pip.py,这里以后只有pip21以上的版本了,对应至少也是python3.6
https://bootstrap.pypa.io/get-pip.py
然后这样安装的pip,不能直接pip install xxxx,要通过指定python2才行
python2.7 -m pip --upgrade virtualenv
- 注意,这里不要运行下面的pip升级,一旦升级就变成pip21版本了,然后python2.7就没法用了
python2.7 -m pip install --upgrade pip
xlrd
接着是xlrd,其实是为了打开xlsx文件,感觉很蠢,非要在linux下用windows这个。要指定xlrd的版本,然后再安装
python2.7 -m pip install xlrd==1.2.0
- 注意以下是错误安装方式,因为这样默认就安装了最新的xlrd,而最新的xlrd不支持打开xlsx文件了,后续运行的时候会报错打不开。
python2.7 -m pip install xlrd
numpy
python2.7 -m pip install numpy
libcanberra-gtk-module
sudo apt-get install libcanberra-gtk-module -y
OpenCV
这个玩意真的是老大难,特别是这个库要的还是个老版本的OpenCV
首先按照下面的教程来安装OpenCV
https://docs.opencv.org/2.4/doc/tutorials/introduction/linux_install/linux_install.html
注意这里OpenCV是2.4.13.7版本,这个版本貌似有点问题,只有源码,实际没有release,从OpenCV的github仓库上已经看不到这个版本的release了,所以后面源码编译我是用 OpenCV 2.4.13.6 来编译的。
https://github.com/opencv/opencv/releases/tag/2.4.13.6
https://github.com/opencv/opencv/releases/tag/2.4.13.7
依赖
这个比较好解决,基本安装都能过
sudo apt-get install build-essential
这里安装的东西太多了,很容易卡住过不去,所以分开安装比较好
sudo apt-get install cmake git libgtk2.0-dev pkg-config libavcodec-dev libavformat-dev libswscale-dev
cmake,git这种比较好安装,没啥问题,主要是剩下的
sudo apt-get install libgtk2.0-dev pkg-config libavcodec-dev libavformat-dev libswscale-dev
尤其是libgtk2.0-dev,非常麻烦的库
把前面下到的openCV的源码解压出来,然后生成makelist文件
mkdir release
cd release
cmake -D CMAKE_BUILD_TYPE=RELEASE -D CMAKE_INSTALL_PREFIX=/usr/local ..
make
开始编译,基本这里是问题最多地方。
make
首先注意一个事情,源码所在路径一定不要出现中文或者空格,否则后面编译到86%左右,会有一个文件编译报错,仔细看会发现路径出错了,然后修改了路径以后,要删除release文件夹,又重新编译,蛋疼。
缺少定义
如果提示缺少CODEC_FLAG_GLOBAL_HEADER,AVFMT_RAWPICTURE,CODEC_FLAG_GLOBAL_HEADER之类的声明,那是为什么你现在的ffmpeg的库太新了,这几个老定义已经移除了,这就导致他找到不了。
In file included from /home/elmagnifico/stm32eclipseguide/opencv/modules/highgui/src/cap_ffmpeg.cpp:45:
/home/elmagnifico/stm32eclipseguide/opencv/modules/highgui/src/cap_ffmpeg_impl.hpp: In function ‘AVStream* icv_add_video_stream_FFMPEG(AVFormatContext*, AVCodecID, int, int, int, double, int)’:
/home/elmagnifico/stm32eclipseguide/opencv/modules/highgui/src/cap_ffmpeg_impl.hpp:1484:21: error: ‘CODEC_FLAG_GLOBAL_HEADER’ was not declared in this scope; did you mean ‘AV_CODEC_FLAG_GLOBAL_HEADER’?
 1484 |         c->flags |= CODEC_FLAG_GLOBAL_HEADER;
      |                     ^~~~~~~~~~~~~~~~~~~~~~~~
      |                     AV_CODEC_FLAG_GLOBAL_HEADER
/home/elmagnifico/stm32eclipseguide/opencv/modules/highgui/src/cap_ffmpeg_impl.hpp: In function ‘int icv_av_write_frame_FFMPEG(AVFormatContext*, AVStream*, uint8_t*, uint32_t, AVFrame*)’:
/home/elmagnifico/stm32eclipseguide/opencv/modules/highgui/src/cap_ffmpeg_impl.hpp:1512:30: error: ‘AVFMT_RAWPICTURE’ was not declared in this scope
 1512 |     if (oc->oformat->flags & AVFMT_RAWPICTURE) {
      |                              ^~~~~~~~~~~~~~~~
/home/elmagnifico/stm32eclipseguide/opencv/modules/highgui/src/cap_ffmpeg_impl.hpp: In member function ‘void CvVideoWriter_FFMPEG::close()’:
/home/elmagnifico/stm32eclipseguide/opencv/modules/highgui/src/cap_ffmpeg_impl.hpp:1686:35: error: ‘AVFMT_RAWPICTURE’ was not declared in this scope
 1686 |         if( (oc->oformat->flags & AVFMT_RAWPICTURE) == 0 )
      |                                   ^~~~~~~~~~~~~~~~
/home/elmagnifico/stm32eclipseguide/opencv/modules/highgui/src/cap_ffmpeg_impl.hpp: In member function ‘bool CvVideoWriter_FFMPEG::open(const char*, int, double, int, int, bool)’:
/home/elmagnifico/stm32eclipseguide/opencv/modules/highgui/src/cap_ffmpeg_impl.hpp:1920:32: error: ‘AVFMT_RAWPICTURE’ was not declared in this scope
 1920 |     if (!(oc->oformat->flags & AVFMT_RAWPICTURE)) {
      |                                ^~~~~~~~~~~~~~~~
In file included from /home/elmagnifico/stm32eclipseguide/opencv/modules/highgui/src/cap_ffmpeg.cpp:45:
/home/elmagnifico/stm32eclipseguide/opencv/modules/highgui/src/cap_ffmpeg_impl.hpp: In static member function ‘static AVStream* OutputMediaStream_FFMPEG::addVideoStream(AVFormatContext*, AVCodecID, int, int, int, double, AVPixelFormat)’:
/home/elmagnifico/stm32eclipseguide/opencv/modules/highgui/src/cap_ffmpeg_impl.hpp:2214:25: error: ‘CODEC_FLAG_GLOBAL_HEADER’ was not declared in this scope; did you mean ‘AV_CODEC_FLAG_GLOBAL_HEADER’?
 2214 |             c->flags |= CODEC_FLAG_GLOBAL_HEADER;
      |                         ^~~~~~~~~~~~~~~~~~~~~~~~
      |                         AV_CODEC_FLAG_GLOBAL_HEADER
make[2]: *** [modules/highgui/CMakeFiles/opencv_highgui.dir/build.make:154: modules/highgui/CMakeFiles/opencv_highgui.dir/src/cap_ffmpeg.cpp.o] Error 1
make[1]: *** [CMakeFiles/Makefile2:2651: modules/highgui/CMakeFiles/opencv_highgui.dir/all] Error 2
make: *** [Makefile:163: all] Error 2
要解决这个问题就得修改一下对应的头文件
/opencv/modules/highgui/src/cap_ffmpeg_impl.hpp
在上面的头文件中增加宏定义:
#define AV_CODEC_FLAG_GLOBAL_HEADER (1 << 22)
#define CODEC_FLAG_GLOBAL_HEADER AV_CODEC_FLAG_GLOBAL_HEADER
#define AVFMT_RAWPICTURE 0x0020
然后继续编译
找不到opencl_kernels.hpp
接着在74%左右的地方会提示,找不到opencl_kernels.hpp,就是空格导致的,删除路径空格以后好了。
Linking CXX static library ../../lib/libopencv_ocl_pch_dephelp.a
[ 74%] Built target opencv_ocl_pch_dephelp
Scanning dependencies of target pch_Generate_opencv_ocl
[ 74%] Generating precomp.hpp
[ 74%] Generating precomp.hpp.gch/opencv_ocl_RELEASE.gch
[ 74%] Built target pch_Generate_opencv_ocl
[ 74%] Generating opencl_kernels.cpp,opencl_kernels.hpp
Scanning dependencies of target opencv_ocl
[ 74%] Building CXX object modules/ocl/CMakeFiles/opencv_ocl.dir/src/filtering.cpp.o
/home/spearmint/Software/OpenCV Software/opencv-2.4.7/modules/ocl/src/filtering.cpp:52:30: fatal error: opencl_kernels.hpp: No such file or directory
compilation terminated.
make[2]: *** [modules/ocl/CMakeFiles/opencv_ocl.dir/src/filtering.cpp.o] Error 1
make[1]: *** [modules/ocl/CMakeFiles/opencv_ocl.dir/all] Error 2
make: *** [all] Error 2
https://blog.51cto.com/abian/1774706
安装,这里基本没啥问题了,安装完就行了。
sudo make install
执行源码
执行源码的时候还会发现有错,因为,源码中index使用的是float类型,我都不知道他原来是怎么过的编译。需要把他所有numpy里index的地方都套上int(xxx)
IndexError: only integers, slices (`:`), ellipsis (`...`), numpy.newaxis (`None`) and integer or boo
python
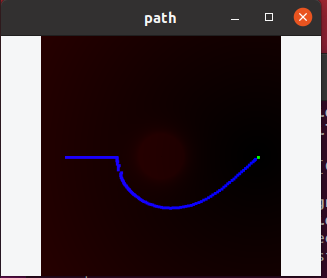
这里需要先把Book1.xlsx,复制到PythonCode,然后执行,就能看到一个简单APF动画了
cd APF-Simulator/PythonCode
python2.7 ./simulation.py
Traceback (most recent call last):
  File "./simulation.py", line 96, in <module>
    simulation('Book1.xlsx')
  File "./simulation.py", line 85, in simulation
    filter_waypoint(points,Map,map_sx,map_sy)
  File "/home/elmagnifico/APF-Simulator/PythonCode/filter_waypoint.py", line 13, in filter_waypoint
    if(Map[mid[0],mid[1],2] < Map[A[i+1][0],A[i+1][1],2] ) :
IndexError: only integers, slices (`:`), ellipsis (`...`), numpy.newaxis (`None`) and integer or boolean arrays are valid indices
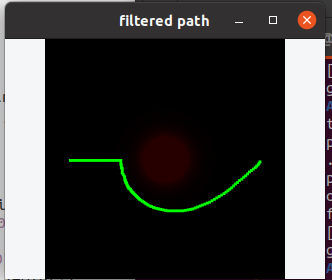
执行结束以后可能还会有这个问题,继续把filter_waypoint中的增加int(),修改完以后就可以看到平滑后的另一个图
https://github.com/elmagnificogi/MyTools/tree/master/APF-Simulator
修改后的源码在这里
吐槽
这个代码来自于IIT Kharagpur,著名的印度理工学院,但是实际上代码我看了一下,非常简单,然后有很多幻数,基本是为了结果调出来的,实际意义不大。我又参考了一下他们实验室的其他仓库,基本就是这一套源码或者说一套逻辑,幻数都一模一样,各种搬过来用一用。估计也就是大二大三水平拿出来用用,填补一下学校开源不足的情况吧。粗糙的很。
Summary
折腾老半天,就看到这么简单一个效果
Quote
https://blog.csdn.net/weixin_43283397/article/details/99678519
https://blog.csdn.net/weixin_44073728/article/details/111054157?utm_medium=distribute.pc_relevant.none-task-blog-2%7Edefault%7EBlogCommendFromMachineLearnPai2%7Edefault-1.control&dist_request_id=1332042.175.16191741276221723&depth_1-utm_source=distribute.pc_relevant.none-task-blog-2%7Edefault%7EBlogCommendFromMachineLearnPai2%7Edefault-1.control
https://junchu.blog.csdn.net/article/details/112128258
https://www.cnblogs.com/haiyang21/p/11029303.html
https://zhuanlan.zhihu.com/p/142014944